Showing posts with label Photo. Show all posts

Monday, January 28, 2013

Snapseed Photo App


So, at the end of last semester I showed the Ipad Initiative what I consider to be the best ipad/photo app around; Snapseed.  I like it better than Photoshop, and I am a rabid Photoshop fan.  Snapseed does everything that pretty much any other app can do to alter or edit a photo.  Not only that, but you have individual control over how it applies any alterations, even to the point where you can specify specific small areas to alter instead of global adjustments to your images.

First, import an image to play with by hitting the "Open Image" button and picking your photo, or shooting directly from the app.  There are a series of adjustments you can apply:

Automatic: takes the choices away and alters the image for you.
Selective Adjust: allows you to tap specific areas (and area sizes) to change
Tune Image: general brightness/contrast/white balance features.
Straighten: straighten and rotate images
Crop: I'm not a huge fan of cropping but you can...
Details: Allows you to sharpen & structure your image
Black and White: self explanatory
Vintage Film: range of old film colors and ranges
Drama: allows you to soften or seriously sharpen your images for whatever mood
Grunge: adds random texture and vignette to your pictures
Center Focus: allows you to control to focus and soften parts of the image
TiltShift: this is an awesome filter that allows you to narrow the depth of field.  Do try.
Retrolux: you can add light leaks, scratches, ultra saturate the images, etc.
Frames: Add different frames, black or white, rough or smooth and more

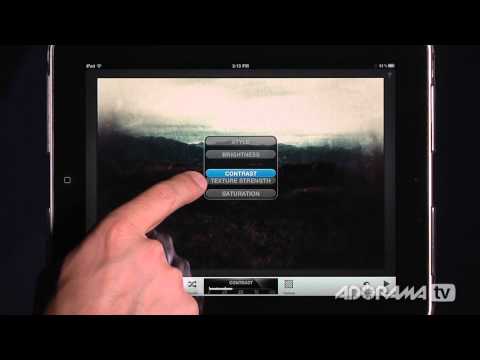
Each adjustment has options.  If you click and drag up or down, you can apply each adjustment to different things: brightness, contrast, saturation are the usual choices.  Once you choose which it should change, you then drag from left to right to change the percentage of the effect.  Here's the options for the Grunge filters:


Not only do you have these different adjustments you can make, each adjustment comes with an entire sublist of alterations called styles that let you change things like color, strength of the effect, etc. You can see a few of the Vintage Film styles below:


Even if you did get it for free, it's still a lot of app to handle because you have so much control.  Feel free to ask me questions in the comment section!  But I've also got a bookmark for you.  For more info and some really nice video tutorials check out the link below: 

Friday, November 30, 2012

Wireless Dslr Shooting with Ipad

I must admit, the primary reason I bought an ipad for our Photo Department is because I read about the onOne ipad app called "Dslr Camera Remote".  This app has a "lite" free version which doesn't do much, and a much heftier version that costs a bunch but packs a punch. 

In a nutshell, if you connect your camera to any computer, notebook or laptop with wifi, an ipad can remotely access all the camera functions with the onOne software.  That means if you are shooting hummingbirds, you can have the camera and laptop right next to the feeder while you hide 20 feet away so you don't scare them off.  Well...why not just use a remote shutter release? 

Because onOne's remote allows you to do a lot more. First off, if your camera has Liveview mode, you can view Liveview on your ipad screen in real time, a great benefit to photographers with bad eyes.  You can change the iso, shutter speed, aperture, focal point, white balance, even exposure bracketing straight from the ipad.  It also has an intervalometer, burst mode and video mode. You also have the ability to view and download the images to the ipad as well as the laptop, allowing you review and make choices about camera controls on the fly.  This would also be of great benefit in the studio; you could have the ipad set up withing view of the model, so they could better understand what the camera sees.  Or you could also have another fun situation--lets say you're photographing a client's children.  You could remove the parents so the kids get silly and have the parents take the pictures from another room.

I regularly use myself as a model in my artwork.  Even though I take great pains to set up my exposure, composition, focal point, etc using a stand-in until I'm ready to shoot, small changes in gesture require me to stop, leave the frame and check my work.  With the ipad app, I could stay in position, have my assistant bring the ipad to me and review what I've done.  Brilliant. 

Here's a video link by Adorama for onOne's app, which can also be used on the iphone.

I've shown this to my Trends in Software class, but we have not been able to use it in the lab itself, since our wifi signal is shoddy at best...so far.  Since our studio is also buffered by a full digital lab and a film lab filled with machines known to interfere with wifi signals, we have already begun the process of adding a new signal and hotspot.  When that changes, we will be incorporating this into our Studio Lighting course as well.
A photo of me using the ipad onOne software to take a photo me while Evil Kitteh is watching.

Now, I will admit I was incredibly bummed out when I read that my Fuji X100 isn't compatible, and if you have a less popular camera brand, you'll need to check their website before you buy.  This isn't a cheap app, and is only useful for those who actually know their camera controls.  But I still think it's super cool every time I click on a spot on the ipad's Liveview and hear my camera refocus on that area. 

Thursday, November 8, 2012

Share Without Cords...

Something I've been using a ton is an app called "Bump."  Using and iDevice (iphone, ipad, ipod) as well as Androids, you can transfer photos to any other device that has the app.  You can also share contacts, web addresses and your social network pages.  The current version for iphone works for ipad, in case you want to download it (for free!).  It's incredibly simple to use.  Here's a quick video on photo use.  


Now, if you class has smartphones or tablets with the app, they could instantly get your  class blog or web page with your school email info by sending it thru bump with a simple tap of your ipad...which would make you look really cool that first day of school.  But that's not all you can do now with Bump.  

My number one use of Bump is transferring photos from either my ipad or iphone to my computer.  Or any computer, as long as it has an internet connection (no bluetooth required).  I hate having to sync with a cord, and I hate paying for transfer apps, too.  I was really happy when I found this feature.  Here's what you do: 


  • Open Bump on your ipad or iphone and select the images you want to transfer, the same as you would if you transferred between iphones.


  • To connect to Bump to your desktop, you only have to go to: https://bu.mp/ (No software download!) Tap the spacebar of your computer with your ipad/iphone to activate the transfer (it's motion activated). 


  • Once you bump, you will see the image show up in a browser window.  You can drag them to the desktop or hit the "download" button. 


That's it!  Bump also has another app I've got which I use on my iphone.  If anyone at your table at a restaurant forget to bring cash or bring tip money, you can pick up the check without having to wait for them to fork up the cash some other day.  They can just "bump" the money from their paypal to yours.  "Bump Pay," is not for class use, but still handy...